
Octoeverywhere & µStreamer on a Pi
This is a quick guide to running the Octoeverywhere Docker container alongside a µStreamer container on your Raspberry Pi. This will provide nice, smooth webcam streaming and printer control for Octoeverywhere on your local network. I recommend using a Raspberry Pi 4 at a minimum for 1080p webcam streaming.
I’ll include the instructions for starting totally from scratch on an empty Pi4 or Pi5.
1. Install “Raspberry Pi OS Lite”
Fetch the software and use the imager tool or grab the image and install it to an SD card
2. Setup the hardware
Plug your Pi into the same network as your printer, add a single 1080p USB webcam, power it on.
3. Install Docker
Install docker as per: https://docs.docker.com/engine/install/debian/
Here is a TL;DR copied from their site:
Add the repo:
# Add Docker's official GPG key:
sudo apt-get update
sudo apt-get install ca-certificates curl
sudo install -m 0755 -d /etc/apt/keyrings
sudo curl -fsSL https://download.docker.com/linux/debian/gpg -o /etc/apt/keyrings/docker.asc
sudo chmod a+r /etc/apt/keyrings/docker.asc
# Add the repository to Apt sources:
echo \
  "deb [arch=$(dpkg --print-architecture) signed-by=/etc/apt/keyrings/docker.asc] https://download.docker.com/linux/debian \
  $(. /etc/os-release && echo "$VERSION_CODENAME") stable" | \
  sudo tee /etc/apt/sources.list.d/docker.list > /dev/null
sudo apt-get update
Install:
sudo apt-get install -y docker-ce docker-ce-cli containerd.io docker-buildx-plugin docker-compose-plugin
Check everything is working:
You should get a ‘hello world’ message -to confirm all is well- by running
docker run --rm hello-world
Add a new docker network:
Now, add the network for your webcam stream: run the command: docker network create web
4. Add the containers
Create the compose and build files
Create a file called “docker-compose.yaml” and paste the following contents in:
---
services:
  octoeverywhere-bambu-connect:
    image: octoeverywhere/octoeverywhere:latest
    container_name: octoeverywhere
    environment:
        # https://octoeverywhere.com/s/access-code
      - ACCESS_CODE=
        # https://octoeverywhere.com/s/bambu-sn
      - SERIAL_NUMBER=
        # Find using the printer's display
      - PRINTER_IP=
    # You can configure and uncomment this section
    # if you don't want to use ustreamer:
    # - ENABLE_MJPG_STREAMER=true
    # - MJPG_STREAMER_INPUT=-n -d /dev/video0 -r 1280x720 -f 30
    volumes:
      - ./octoeverywhere/data:/data
    restart: unless-stopped
---
# Docker container for webcam stream
services:
  ustreamer-container:
    build:
      context: .
      dockerfile: Dockerfile
    container_name: ustreamer-container
    devices:
      - /dev/video0:/dev/video0
    logging:
      driver: "json-file"
      options:
        "max-size": "100m"
        "max-file": "5"
    networks:
      - web
    restart: unless-stopped
networks:
  web:
    driver: bridge
    external: true
Create a file in the same directory called “Dockerfile” and paste the contents: Again, if you use the built in stream from octoeverywhere, and choose not to use the ustreamer container, you can disregard this.
FROM debian:bookworm-backports
RUN echo 'debconf debconf/frontend select Noninteractive' | debconf-set-selections && apt-get update && apt-get upgrade -y && apt-get install -y ustreamer usbutils procps v4l-utils nmon vim util-linux
RUN useradd -r ustreamer && usermod -a -G video ustreamer
USER ustreamer
ENTRYPOINT [ "/usr/bin/ustreamer", "--host=0.0.0.0", "--port=8080", "--device=/dev/video0", "--resolution=1920x1080", "--quality=100", "--brightness=0", "--backlight-compensation=0", "--format=MJPEG", "--device-timeout=30", "--desired-fps=60", "--drop-same-frames=60", "--slowdown", "--persistent" ]
5. Customise for your printer, camera and network
We must edit the docker-compose file to add your:
- Printer IP address
- Printer Serial Number
- Printer Access Code
On your printer, find these details, I’ll be referring only to the Bambu Labs P1S here -if you use a different printer, adjust accordingly-
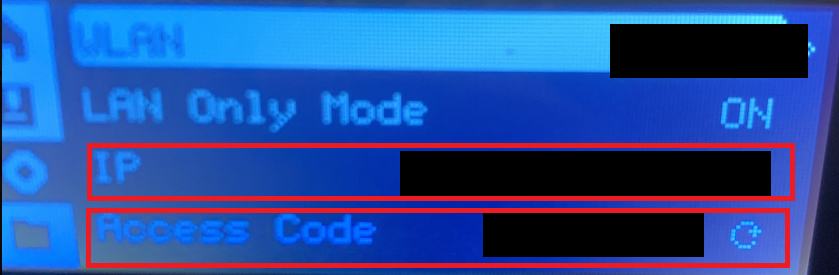
Grab the IP address and access code from the menu as shown in this screenshot.
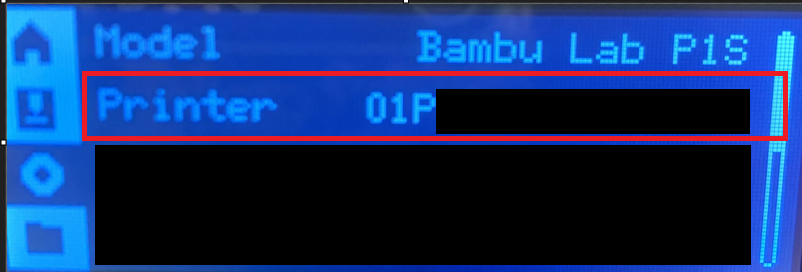
Grab the printer serial number from the menu shown in this screenshot:
With those details in hand, edit the docker-compose.yaml file as shown:

Edit the ustreamer “Entrypoint” string above, if your camera isn’t on /dev/video0 (it should be) or the resolution/settings differ from mine.
6). Start ’er up!
Now bring the containers up with the command:
docker compose up -d
run docker ps to check the output, you should see something like:

7). View your printer stream
Might as well test out your printer stream first, presumably you aimed the camera at the printer, right? Go to your browser and type in http://ip-address-of-your-raspberry-pi:8080

8). Configure Octoeverywhere app
Go to the browser and hit up https://octoeverywhere.com/
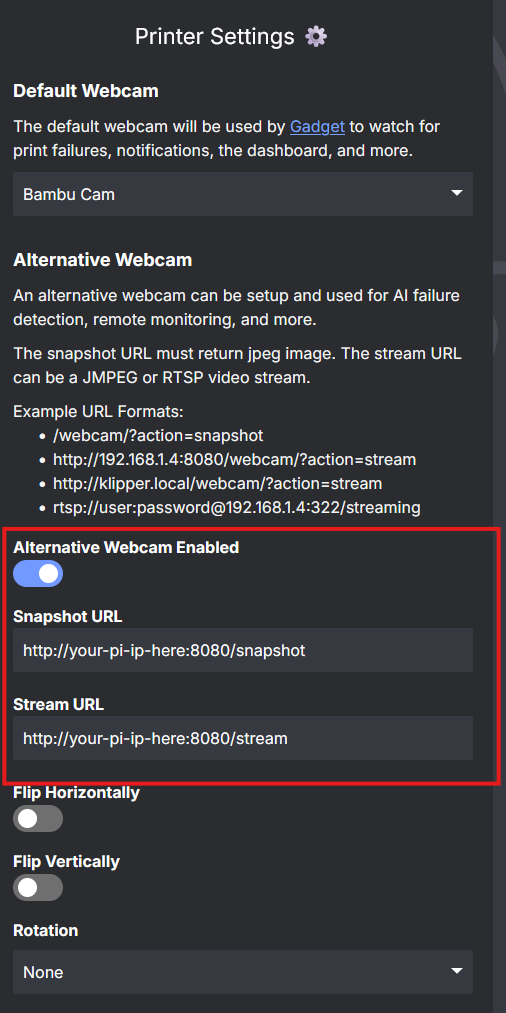
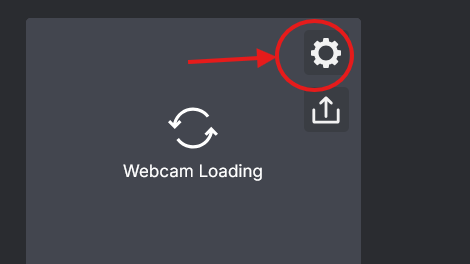 Add your camera by specifying your Pi’s IP address in the app, as shown in the screenshot:
That’ it. Happy printing!